Showing posts with label some assembly required. Show all posts

Thursday, November 18, 2010

Today's the day: Countertop Installation

Well, here we go. We are waiting on the countertop dudes to arrive. Before the chaos ensues, I thought I would memorialize the laminate-that-was:


Ahh.

And here's the view from the other side of the "Cheeseburger Window:"


We got inspired the day the guy came to template the countertop and asked him to measure for the piece in the opening of the Cheeseburger Window, too. I'm excited for that; because it was less than 5 square feet, it didn't affect the cost of the project at all. (!) I've removed the moulding from the sides; the countertop guys will take off the sill-piece that's there, then we'll trim the old moulding and put it back.

So... that's where we are right now. I'll update as I can get more pictures. In the meantime, party in the dining room:

UPDATE:  Sink is out; the Mr. spent awhile on the floor.


In the foreground are tools integral to the job: drill bits, a spray nozzle, and a spoon.

UPDATE: Old counter is out.

UPDATE: OMG, SHINY!  Also, the new sink is HUGE.

UPDATE: Slight hiccup with the faucet-hole placement. Offset sink with bowl on left + faucet with attached lever on right + soap dispenser + sprayer thingie = interesting combination.


FINAL UPDATE: It's dooooone!!! Yaaaay!  We love it. Sorry for the blurry/dark/grainy/cropped pictures, we have a good bit of  'touching up' to do on parts of the cabinets that had been covered by the lip of the old counter and I was trying to find an angle that looked as complete as possible. We're not hooking anything back up tonight.. we figure we should let the silicone cure or whatever.  Also, the fumes are killing our brain cells and we need a beer to celebrate.


The enhanced Cheeseburger Window (it's like a wee breakfast bar!):


The installation guys were great--they did a super job with topsy-turvy cabinets, walls, and cutouts. Can't wait for y'all to see it!

Monday, June 8, 2009

Just don't throw them at the windows.

We made a ladder-golf set! It was stinkingly easy. And kind of fun; like k'nex for adults. We used the great instructions found here, and have enjoyed many a game thus far. In the making:
Bits and pieces (= fun.)
Ta-da!
The "bolos" or whatever you call them (nunchucks?) are made out of nylon rope and two golf balls. Drilling a hole in the golf balls was a potential problem; the instructions use a drill press (we just bought a lawn mower--we don't have a drill press). The Mr. gave it a try with his hand-held drill, which, but for the added risk of drilling through a finger, worked pretty well. Then you throw the nunchuck-things at the ladders and try to get them wrapped around the rungs. It's fun. Honest. So after he set out to make these things, we've been seeing ready-made sets everywhere; however, we still have yet to see one that's cheaper than this was to make...

Tuesday, May 19, 2009

Well, it hasn't fallen down, yet.

So we have a tiny (as in 7' x 8') "office." I'm convinced it used to be a pantry, or something, but the agent listed it as an office, so we went with it. When it comes down to it, it's plenty of room for a desk, a chair, and a bookcase. We also have two filing cabinets that are a little worse for the wear (one was originally my sister's, and is in good shape but for having been moved four or five times; the other came from beside a dumpster at my old apartment complex and claims to contain "Rob's Professional Files." Sometimes I wonder who Rob was, and whether he had another filing cabinet for his unprofessional files.) Right. Anyway, the point is, they're different sizes, so stacking things on top of them looks kind of weird. Eh, here's a picture. It illustrates the "problem" better than anything:
Photobucket
Yeah, that's ugly. Needless to say, none of our furniture quite offered a solution ("yea tall, deep enough for two filing cabinets, wide enough for two printers on top and a trash can underneath"), so we tried our hand at furniture-making. Anybody who actually builds furniture might suffer some sort of trauma seeing the following ("you used L-brackets where!?"), so.. warning. Construction pictures:
Photobucket Photobucket
Top board, left, and legs. The top board was precut 2' x 4' 1/2" plywood (about $6, I think), and the legs were actually deck rail supports. They were way cheaper than the actual "table legs" we found at Home Depot ($3 apiece), and longer, which turned out to be a good thing. The top, put together:
Photobucket
It sat like that for a week or two. Then we got around to putting the legs on it:
Photobucket
Okay, so it's not going to win any awards. That back brace looks kind of stupid, we realize. But you won't really be able to see it, and if it keeps our printers from falling on the floor, bring on the stupid. I used some of the leftover quarter round from trimming the baseboards around the top edge, and painted the whole thing white to match the trim in the office:
Photobucket
I find I'm often painting things at, like, dusk. So if you come visit, don't stare at anything too hard. It's surprisingly stable. We got it in, festooned it with printers, and I made it a tiny curtain to match the valances I'd made for the windows in there. Here's the "after" shot:
With the paint and lots of L-brackets, it came to something between $20-$25, which is about as good as we could have hoped for. We'll just hope it keeps standing...

Saturday, May 2, 2009

Flatpackin'

I've already mentioned our trip to our local IKEA (sidebar, those of you out there who actually do live in one of the, what, six? major US cities to have its own big blue store of Swedish modern wonder: to us, "local" means "closer than the others," and a trip to one still means hours--yes, hours--on the highway listening to our own tailpipe rattling, because no matter who you are those boxes don't fit in the back of a Jeep and aren't we lucky that IKEA knows that about us and provides nylon cord for us tie down our hatches if we're unprepared to do so? For some of us, IKEA shopping takes determination and a certain amount of faith in complimentary insurance mechanisms), and there's not much to say, other than we bought a couple of very large pieces of furniture. It's always easier to put them together than I expect it to be. Our MARKOR still flat-packed:
Photobucket
It might sound stupid, but I find the whole thing less intimidating if I separate all the bits-and-pieces first (it's faster, later on, but also make us familiar with the parts so we're less likely to use the wrong thing at the wrong time). A gajillion pegs, bolts, etc., during the sorting process:
Photobucket
45 minutes (or so?) later:
Photobucket
"Bam." Okay, I stink at photojournalism. I was too involved to take pictures. It's now filled with books--really sturdy. We actually got this because what we were there to get turned out to be, like, two inches too big for the wall it had to go on. This particular one wasn't something either of us had picked out online; for some reason it looked a lot better in the store, and we're really happy with how it went up. The other giant thing we got was a wardrobe--the LEKSVIK 3-door, to be exact. We already had a dresser with the same finish. It's ginormous, but it does what we needed it to--we basically needed a second closet in our bedroom, where there wasn't one. I'll try to remember to take a picture of it.

Tuesday, March 31, 2009

The $5 Chandelier Experiment

Well, before I get too far I'd like to take you all off yer tenterhooks and say that the experiment was a success, thanks in no small part to the help of my father-in-law (and my mother, who didn't say, "you're going to do what to it?" and instead helped me prepare it for a makeover.) Back to the beginning. While ceiling fans are great (we know, we've been living without them), we wanted something a little closer to the ground (have I mentioned the ceilings in the old part of the house are 10 feet?) in the dining room. I'm not a huge fan of overhead lights that hug the ceiling, so a chandelier seemed an obvious option. New chandeliers, however, are expensive. I didn't like a lot of what I saw in home improvement stores. I liked some things I saw elsewhere: Pottery Barn:
Restoration Hardware:
But! spending $300-500 on a light fixture would be painful, I think, even if we could. So we (admittedly) went pretty far in the opposite direction and decided to try and make a $5 chandelier we found at a Habitat ReStore work. 
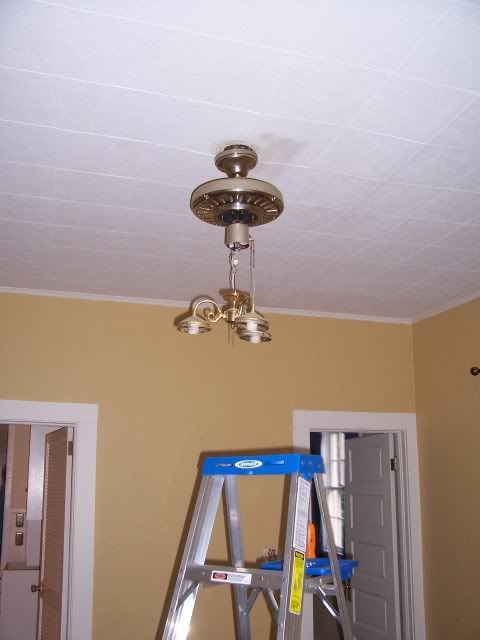
The last vestiges of the old fan (sorry for not taking a more complete 'before' picture):
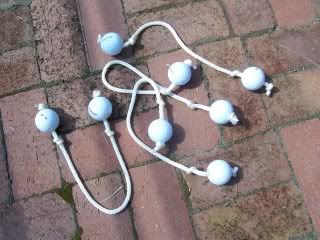
I'm having trouble finding the picture I took of the chandelier, pre-makeover, but it looked pretty much like this--only older, and having been ripped unjudiciously out of the ceiling of its former home:
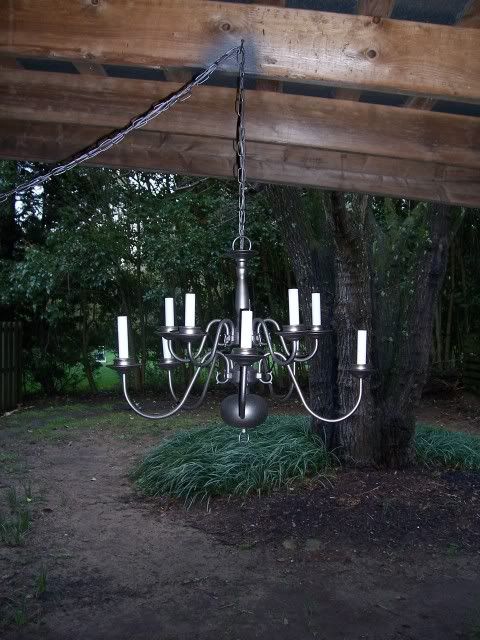
My father-in law attached a new wire and chain to the top (the old one was about 2 feet long, and since the old fan was in the middle of the room and the table wouldn't be--lest you need to crawl over it to get to the kitchen--we needed some length to swag). We then hung it in the carport to be spray-painted (which, by the way, was an interesting look; it's surreal having a fairly formal-looking chandelier hanging over the hood of your car.) I then spray-painted the whole thing, chain and all, with Valspar "Metal" spray-paint in "Graphite," which is a tad browner than it appears in this picture:
The above was taken after the "candle" sheaths were replaced. They were removeable, so we took them off pre-spray-paint and wrapped painters' tape over the bulb sockets inside. A close-up:
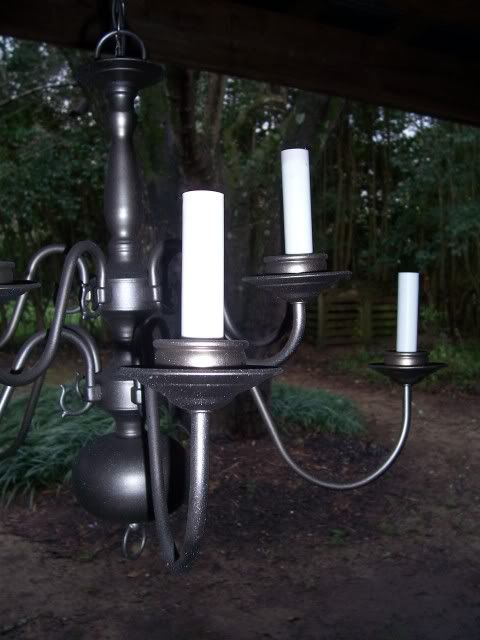
By the way, it wasn't dark when I took this. It was overcast. This was one project that was going on during the "great moving-weekend storm" that left puddles of mud inside and out, made our yard look like a convention of chia pets come to roost, and effectively splattered all of the tile-and-saw-dust from the goings-on with the floor all over the side of the house. But you know, whatever. We got a good chance to tell if there were any roof leaks. So... given the chandelier, the wiring kit, and 2 cans of spray paint (I probably could have gotten away with one, but I wanted to be sure it was as even as possible), we're now up to about $27 for the whole project. Finally, my father-in-law attached the whole thing to the ceiling where the fan had been, and we flipped the breaker. Success! In situ, with ten tiny shades attached (these we found at Lowe's):
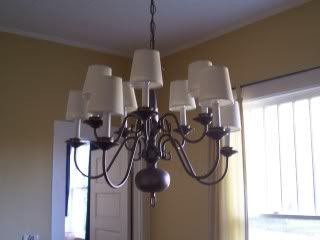
Not too shabby, for a total of about $60 (including the shades, which weren't strictly necessary, and the extra hardware for the swag hook, which needed to be longer than the one in the kit due to how the ceiling was constructed). We're really pleased with it, and it makes the room look a whole lot different. So.. lessons learned, I guess--it's great to have a family member who's handy with the electrical stuff (had we not--I'm thinking of that Pepsi Max commercial. "Ready?.... Nooo."), and don't try to spray-paint the underside of something while your face is four inches away from it and upside-down. Especially if you wear contacts. My eyeballs haven't fallen out yet, but it was iffy there for awhile. More pictures to come, once the room is clear of boxes and we get the table/chairs in place. Thanks to all who helped!

Thursday, March 26, 2009

Four Green Chairs, ISO Large, Fun-loving Table.

"Hi."
As we have never before had a dining room to call our own, it might come as no surprise that we had no dining furniture. Call me naive, but I didn't realize that SIDE CHAIRS could cost $200 (or more!) APIECE. Thus, our outlets for finding dining furniture have looked more like thrift stores and consignment shops. Which, actually, has been really fun. I'm kind of picky about this, and won't order anything online without seeing it first--this is our first house and the first time we've actually been responsible for finding our own furniture to serve a specific purpose. Thus! We were really happy to find this set of 4 (green!) side chairs for a steal at a local shop. They'll be the first of a set of chairs that we'll be able to use not only as dining chairs but extra seating throughout the house. The wall color in the dining room (hard to tell from this photo) is a kind of mustard-yellow, so they complement it really well. When we bought the fabric for the upholsterer, I also found some more that blends this emerald green with mustard yellow AND a soft cadet blue--something that will coordinate our dishes (and the new kitchen wall color--but more on that later) with all the green and yellow. What'll we use the fabric for? Seat cushions (or covers, if we find chairs we like that have upholstered seats), a piano bench seat, or a curtain panel--BWA, HAHAHAHA. The chairs are table-less right now, but they shouldn't be after this weekend. Pier 1 has an amazing table (big, slab-top, distressed--everything we were looking for) that we'll pick up as soon as we have the vehicle to do so. We weren't looking for too formal a table; this is going to have to serve every purpose we could throw at it--breakfast, dinner, crafts, games, easter-egg dying--so we wanted something we wouldn't always be worried we'd ruin. This is a horrible picture, but should give you an idea (fyi, it's Pier 1's "Torrance" table, and it's big--84" by 42"):
I think that's it re: Table and Chairs. Will post pictures once table has arrived and is constructed...